Scraping molecular information from ChemSpider using Processing.

I’ve spent the evening knocking out this little sketch to scrape molecular information from ChemSpider to inform my mass spectrometry. Until now I’ve been doing this by hand or getting the students to, when they are able, but this is the start of my attempt to automate the process. Ultimately I will just want to feed it a text file of compound names and it will parse the output into a document.

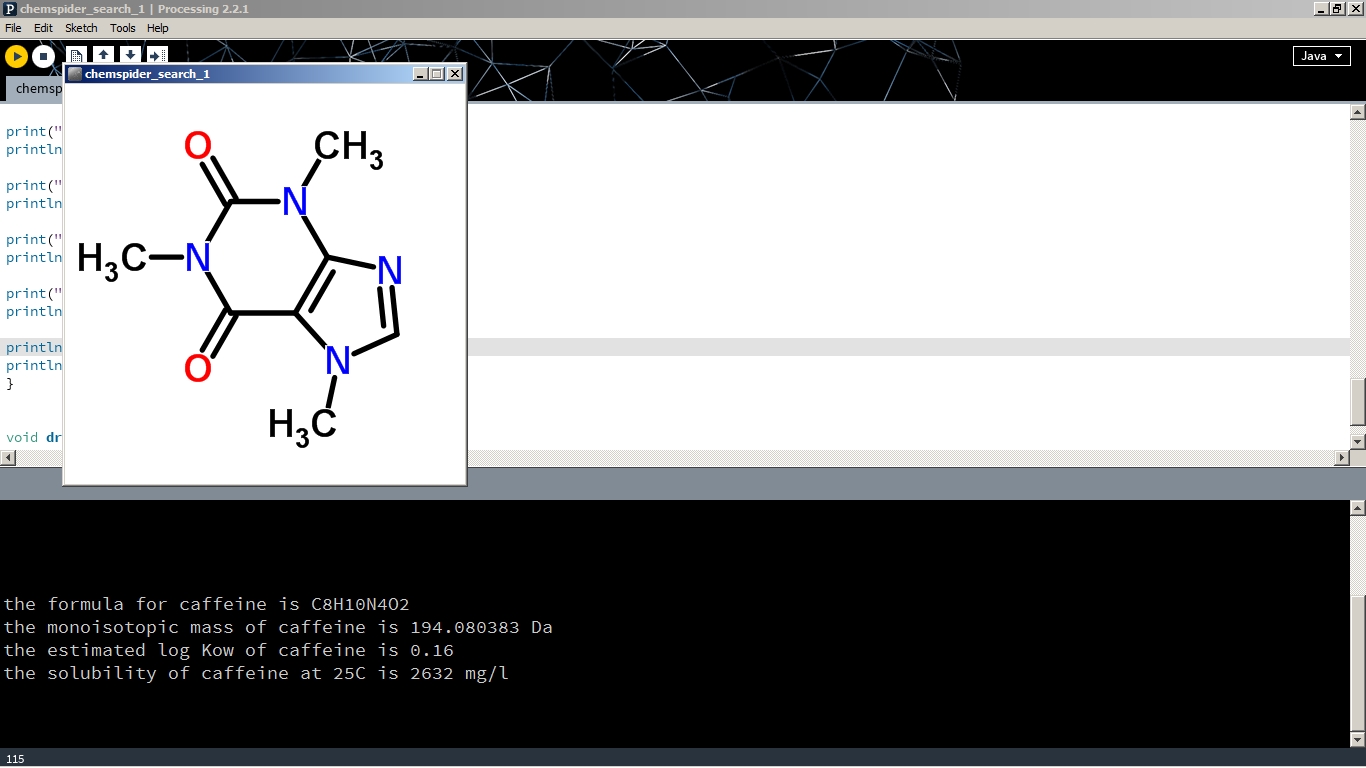
Open a Processing window, copy the code below into it, edit the first string to contain the name of the compound of your choice and click run. Here’s an image of example output.

Processing ChemSpider sketch output

// sketch to grab molecular information from a named compound from ChemSpider
// AUT School of Applied Science
// June 2015
// drchrispook@gmail.com
// released under GPLv3 licence – https://gnu.org/licenses/quick-guide-gplv3.html

// ~ ~ ~ ~ ~ ~ ~ ~ ~ ~ ~ ~ ~ ~ ~ ~ ~ ~ ~ ~ ~ ~ ~ ~ ~ ~ ~ ~ ~ ~
// enter the compound name you want information for
String compound = “caffeine”;
// ~ ~ ~ ~ ~ ~ ~ ~ ~ ~ ~ ~ ~ ~ ~ ~ ~ ~ ~ ~ ~ ~ ~ ~ ~ ~ ~ ~ ~ ~

// sketch continues
PImage webImg;

String URL = “http://www.chemspider.com//Search.aspx?q=”;
String nameURL = URL + compound;
String[] html1 = loadStrings(nameURL);

String CSID = “CSID”;
String formula = “formula”;
String MIM = “MIM”;
String solubility = “solubility”;
String logKow = “logKow”;
int imageSize = 400;
void setup() {
size(imageSize, imageSize);

for(String i:html1) { // iterate through each string in the array
// println(i);
int line = i.indexOf(“CSID:”); // identifies CSID line by searching for this string

if(line > 0) { // if you find that string
String[] trim1 = split(i, ‘,’); // split off the junk
// for(int i = 0; i < trim1.length; i++) { // println(trim[i]); // } String[] trim2 = split(trim1[0], ‘:’); // split off more junk CSID = trim2[1]; // set the CSID break; } } String imageURL = “http://www.chemspider.com//ImagesHandler.ashx?id=&#8221; + CSID + “&w=” + imageSize + “&h=” + imageSize; webImg = loadImage(imageURL, “jpg”); String CSIDURL = “http://www.chemspider.com//Chemical-Structure.&#8221; + CSID + “.html”; // use the CSID to construct the url to that molecule’s entry String[] html2 = loadStrings(CSIDURL); // grab the html //println(html2); for(String i:html2) { // this is the main part of the macro // println(i); int MIMLine = i.indexOf(“Monoisotopic mass”); // identifies MIM line int formulaLine = i.indexOf(“Molecular-Formula”); // identifies the formula line int solubilityLine = i.indexOf(“Solubility at 25 deg C (mg/L):”); // etc int logKowLine = i.indexOf(“Log Kow (KOWWIN”); // etc if(formulaLine > 0) {
String[] trim1 = split(i, ‘/’);
// for(int e = 0; e < trim1.length; e++) { // println(trim1[e]); // } String[] trim2 = split(trim1[2], ‘”‘); formula = trim2[0]; } if(MIMLine > 0) {
String[] trim1 = split(i, ‘>’);
// for(int e = 0; e < trim1.length; e++) { // println(trim1[e]); // } String[] trim2 = split(trim1[3], ‘ ‘); MIM = trim2[0]; } if(solubilityLine > 0) {
String[] trim1 = split(i, ‘ ‘);
// for(int e = 0; e < trim1.length; e++) { // println(trim1[e]); // } solubility = trim1[12]; } if(logKowLine > 0) {
String[] trim1 = split(i, ‘ ‘);
// for(int e = 0; e < trim1.length; e++) {
// println(trim1[e]);
// }
logKow = trim1[11];
}
}
print(“the formula for ” + compound + ” is “);
println(formula);

print(“the monoisotopic mass of ” + compound + ” is “);
println(MIM + ” Da”);

print(“the estimated log Kow of ” + compound + ” is “);
println(logKow);

print(“the solubility of ” + compound + ” at 25C is “);
println(solubility + ” mg/l”);
}
void draw() {
background(0);
image(webImg, 0, 0);
}

Advertisement

selectInput() and while() loop headaches in Processing 2.2.1

I’ve been working on a Processing sketch that uses a selectInput() dialogue to ask for a CSV file. The example in the Processing reference doesn’t work very well because the sketch doesn’t pause and wait for you to select the input. It opens a open-file window and then immediately skips on to running rest of the code before you’ve selected your file, which predictably crashes because it contains references to a file that hasn’t been selected yet and so resolve to null.

A solution proposed on the forums is to add a while() loop after selectInput() which pauses the sketch while the selected file == null. As soon as you’ve selected the file you want to work with this ends the while() loop and the rest of the sketch proceeds with the selected file, like so: 

String sourceFile = “pause”;

selectInput(“Select a file to process:”, “fileSelected”);  // select an AMDIS results file to process – MUST BE A CSV
while(sourceFile.equals(“pause”)) {}  // wait until a file is selected

This used to work in a previous version of the sketch I wrote but I’ve recently updated Processing to 2.2.1 and, of, course things that used to work now don’t. Grrrrrrr. This might be something to do with there needing to be at least one statement. For eg, if I put a println() statement in there it simply keeps printing the same thing until I’ve selected a file. This makes the while() loop fulfil its function in pausing the sketch but the looped process of printing a zillion strings to the terminal burns up processor time and can even make the whole sketch hang. An inelegant solution. 

As an alternative a post on StackOverflow (which is the most amazing hacking resource, by the way) offered an alternative code snippet utilising a different file open dialogue from the javax.swing library. This works perfectly, if still eccentrically as it uses the old XP style file open dialogue which defaults to the location of the desktop and requires much clicking if you happen to have a deep folder structure. As a plus though it allows you to use shortcuts to navigate, unlike the native Windows 7 file open dialogue, so a quick shortcut link to your data folder plonked on the desktop facilitates rapid access to your target. 

A couple of shots showing an Arduino Nano I’ve put into the aqualab to monitor the sump temperatures on the recirculation system for an upcoming ocean acidification project run by Kay Vopel (http://www.vopel.org/). The Nano is reading two waterproof DS18B20 temperature sensors, one in the sump and one on the outflow from the mixing barrel, as well as a DHT22 air temperature & humidity sensor. The sensors are fed through holes melted in the HDPE of the little tupperware container its mounted in and the holes have been sealed with hot glue. The Nano is on the end of a 5m USB cable that stretches over to the PC on the bench opposite.

The monitor is showing my Processing datalogger sketch running. There’s two incidences of the sketch running, as there’s two recirculation system so there’s two Arduinos. The second one doesn’t have a DHT22. The data is plotted, shown numerically at the top of the screen and logged to text file. One day I’ll hack out a solution to read data from two Arduinos into one sketch but for now this was a quick and dirty solution.

Both plots show a pink and a yellow line climbing gently across the screen. These are the water temperatures. The MSc student increased the temperature on the water cooler yesterday and the system’s still equilibrating. The blue zig-zag line shows the air temperature bouncing up and down as the aircon switches on and off.

logging thermocycler performance

My favourite PhD student (hi, squids!) was having issues with her PCR. She was ending up with empty tubes at the end of her program and was concerned that the machine wasn’t producing the right temperature cycle. As I had an Adafruit MAX6675 thermocouple board on my desk I offered to log the cycle to determine whether this was the case. I used a miniature breadboard to connect the Arduino Nano and MAX6675 breakout. The measurements were output to serial and logged to text file by a PC running my Processing datalogger sketch. Here’s the result:

image

There seems to be some real issues here as the temperatures don’t match the program well at all. There’s meant to be a 55C step immediately before each polymerisation hold at 62C and the sensor gets no where near this. This might be a result of poor heat transfer between the reaction tubes and the thermocouple but I figure that accurately reflects the same process of heat transfer between the block and the liquid in the reaction tubes. 

I’ve run the test again in a different well on the block. I’ll need to validate the thermocouple’s temperatures using another couple of thermometers to make sure its giving accurate temps but just this initial test has revealed a problem worthy of serious investigation. The fun continues another day … .